
Basic Git Tutorial Crash Course
Git is a code repository. It allows you to save versions of code and collaborate remotely using github.com. Here are the basics of how to use git:
Basic Requirements
You will need the following:
- a Git Hub Account
- a Code Repository
- a git client to talk to the repository
Examples in this document are using random push and pulls and do not match. They are all isolated examples.
Create a Github Account
This is pretty self explanatory – just go to github.com and create a new account. It’s free.
Creating a Code Repository
Once you have an account, click on the Repositories tab and create a new one:

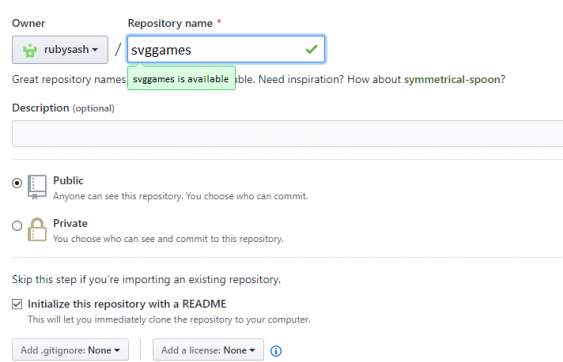
Next, you’ll want to create a repo by giving it a name and deciding if you want it public or private. If you make it public, you won’t have to create git keys using an authentication token. I would also choose to create the README. I am using a repo name called “ssl-verify” but you can make your repo name anything you want.
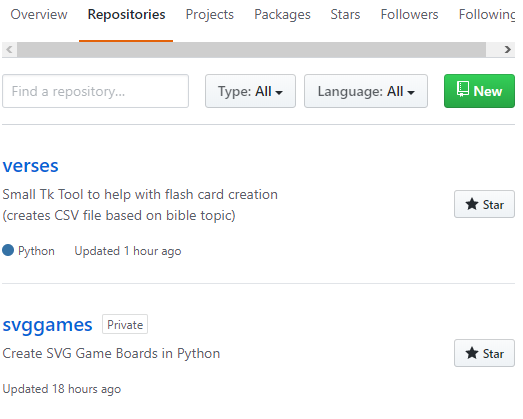
In the example below I have two repos creating so far. The first one is called “verses” and the second “svggames“. The screen is not showing the “ssl-verify” repo that I created in our example.
It is possible to have other code repositories besides github. Specifically your company may give you a URL to use. Github is the public repository that everyone can use and it works the same for the commercial/private code servers (mostly).
Installing a Git Client
You can run the git client on Windows, Mac, Linux, etc. Whatever OS you have, it has a git client.
To install git on debian/ubuntu (such as a Raspberry Pi) based systems, type:
|
1 |
sudo apt-get install git |
If you are on windows and can use CLI, I prefer Cygwin. This tutorial will go over CLI version. If you need a GUI in windows, there are several git windows clients to choose from, both free and paid:
- https://www.sourcetreeapp.com/
- https://desktop.github.com/
- https://tortoisegit.org/
- https://wiki.gnome.org/Apps/giggle/
There are at least 20 gui clients for mac, linux and windows in this list of clients on git-scm.com. I personally use the cygwin client.
Using Git
Now that you have an account, a repository and a client, you can begin working in git.
The basic steps are:
- Clone your repo
- Add/Modify Files
- Commit Files to Change List
- Push Files to Repo
Cloning a Git Repository
Cloning takes the copy of files in a repo and moves them to your current directory, locally. You will need to get the repo URI. This is in the format of:
|
1 |
https://github.com/account/reponame.git |
For example, my svggames repo is shown when I click the clone or download box:
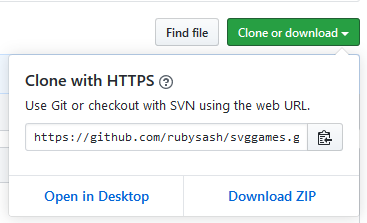
Now that I have the .git location URI, I can use it in the CLI or client of your choice:
|
1 2 3 4 5 6 |
$ git clone https://github.com/rubysash/svggames.git Cloning into 'svggames'... remote: Enumerating objects: 3, done. remote: Counting objects: 100% (3/3), done. remote: Total 3 (delta 0), reused 0 (delta 0), pack-reused 0 Unpacking objects: 100% (3/3), done. |
At this point all of the files in the repo have been downloaded to my local directory in a folder called “svggames”. So I will change to that directory and being coding/modifying/whatever (I use CLI, so I actually type):
|
1 |
cd svggames |
If I wanted to get in the habit of checking git status, it would show that nothing is modified (this is true, because I just downloaded it a few seconds ago).
Add/Modify Files
Now if I wanted to modify a file, I can open it locally and make my changes or even use the code as-is – assuming there is a run/install script there. If I make changes, Git will recognize that the file has changed. For tutorial purposes, assume that I have modified the README.md with a few more tips or instructions and want to upload it. I can verify what git client sees by using the “git status” command after Ive modified the README.md:
|
1 2 3 4 5 6 7 8 9 10 11 |
$ git status On branch master Your branch is up to date with 'origin/master'. Changes not staged for commit: (use "git add <file>..." to update what will be committed) (use "git checkout -- <file>..." to discard changes in working directory) modified: README.md no changes added to commit (use "git add" and/or "git commit -a") |
Git is telling me I need to commit add a file and then commit.
Commit Files to Change List
We will commit our list of files later, but first we have to add which files will be in that list. The command is simply “git add
|
1 |
$ git add README.md |
Commiting a File
Committing allows us to add a comment to each commit. I like to add a file, then commit, then push – one at a time. This keeps my logs clear on what I am doing.
|
1 2 3 4 |
$ git commit -m "Created initial README info" [master 5913b53] Created initial README info 1 file changed, 22 insertions(+), 2 deletions(-) rewrite README.md (75%) |
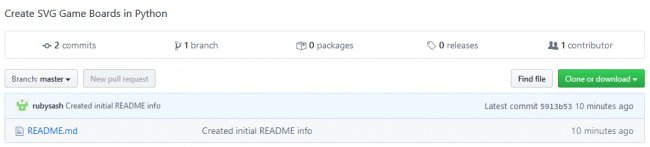
Git tells me the files changed and the comment has been included “Created initial README info”. This will show up later when I check git logs, or in the github.com repo for my account and repo “https://github.com/rubysash/svggames/” if anyone reviews it later.
Pushing Files to Repo (Merge)
Finally I have made changes, told git which files I want uploaded using the “add” command, committed them with a comment using the “commit” command. My final step is to upload them using the “push” command:
|
1 2 3 4 5 6 7 8 9 |
$ git push Enumerating objects: 5, done. Counting objects: 100% (5/5), done. Delta compression using up to 12 threads Compressing objects: 100% (2/2), done. Writing objects: 100% (3/3), 801 bytes | 114.00 KiB/s, done. Total 3 (delta 0), reused 0 (delta 0) To https://github.com/rubysash/svggames.git 2fe8e0f..5913b53 master -> master |
Looking in the web view, I can see my commit a few minutes ago, and the new commit comment:
Pushing Files to Repo (Overwrite)
If you want to simply overwrite what is in the repo with your local copy, and ignore what is there, you can use the force (Luke):
|
1 |
git push origin --force |
Git Pull (Merge)
If I wanted to collaborate and someone else was working on the code with me, or if I had code in multiple locations (such as home/office), I could use git pull to get an updated version of the code before I started doing my own edits. If there were changes git would tell me details of those changes, or it would go ahead and do the code merge from the remote to my local code:
|
1 2 3 4 5 |
$ git pull Updating d90efa1..a129909 Fast-forward README.md | 14 ++++++++++++++-- 1 file changed, 15 insertions(+), 2 deletions(-) |
Git Pull (Overwrite)
In the event that you want to overwrite your local copy from the repo you might get this message:
|
1 2 3 4 |
error: Your local changes to the following files would be overwritten by merge: data/sitechecker.db Please commit your changes or stash them before you merge. Aborting |
A git reset will ignore your local changes and allow you to do a git pull without asking for a merge.
|
1 2 |
$ git reset --hard HEAD is now at 48236d3 added groups, added import from xlsx, need fix on group refresh |
Now your merge works:
|
1 2 3 4 5 6 |
$ git pull Updating 48236d3..6a75117 Fast-forward app.py | 14 ++++++-------- data/sitechecker.db | Bin 241664 -> 241664 bytes 2 files changed, 6 insertions(+), 8 deletions(-) |
Git Log Review
I could also review all of the changes I made to help me decide what I might need to roll back. Here is a sample of the session that matches what we just did:
|
1 2 3 4 5 6 7 8 9 10 11 12 |
$ git log commit 5913b53f3e5f3528436ab63de5a050451d89 (HEAD -> master, origin/master, origin/HEAD) Author: Dave <dave@rubysash.com> Date: Fri Apr 17 11:00:55 2020 -0500 Created initial README info commit 2fe8e0f724cb691784d61f85ef088dd0fcfd91 Author: rubysash <1234+rubysash@users.noreply.github.com> Date: Thu Apr 16 14:46:17 2020 -0500 Initial commit |
Ignoring Files/Folders
The .gitignore file will allow you to ignore changes done to files in certain locations (folders/files). Edit it and add in things you don’t want to synchronize:
|
1 |
pi@raspberrypi:~/sqlalchemy $ vim .gitignore |
For example, you may not want your entire python environment uploaded to github, so you would exclude files and directories by adding these lines in your .gitignore file:
|
1 2 3 4 5 |
lib/ bin/ include/ shared/ pyvenv.cfg |
Usage Summary
Here is a quick reference to help you with the basics:
- git clone
- Downloads the repo to your local device
- git add
- Adds files to the tracking list
- git commit
- Adds all tracked files to the commit queue
- git push
- Uploads all of the commit queue to your remote repo
- git push –force
- Uploads all of the commit queue to your remote repo, overwriting without a merge
- git pull
- Downloads any changed files to your local repo
- git reset –hard
- Downloads any changed files to your local repo, ignoring your changes and simply overwriting your files
- git status
- Shows what git knows about, what has changed
- git log
- Shows all commits and their comments
That is the basic method for creating a repo, and managing files in it. There are many other git commands for branching, adding users, making things private, creating projects, workflows and more. Git is a robust code management solution and should be something you know how to access, and use if you work with code.