
Use SSH Tunnel as Socks Proxy Firefox
SSH tunnels are like a poor man’s VPN. You can create an encrypted channel, then pass data over that channel. One of the most common things to pass over an SSH Tunnel is web browsing data (SOCKs Proxy).
Basically you will create a SSH Tunnel from your client to a remote server. The server will then relay any information you send it and connect to the final server like it came from your intermediary server instead of the client.
Reasons to Use SSH Tunnel/Socks Proxy
Don’t count on a SSH Tunnel to bypass everything, but it has other uses too.
- Socks Proxy to Bypass Firewall
- If you are behind a firewall that doesn’t allow DNS or web browsing you can simply bypass it (assuming SSH IS allowed). Some firewalls also inspect traffic and will disallow ssh tunnels. Some firewalls allow port 80 or port 443 traffic but not port 22. Others will check the application headers to verify that your 443 traffic is actually https, and not ssh.
- Socks Proxy for Anonymous Browsing
- Let’s say I wanted to browse Ruby Sash Consulting, but I didn’t want my IP address of my client to show up in the logs. A socks proxy uses the server I SSH into instead of my client IP. Furthermore, my ISP could read my DNS queries normally, so an encrypted connection would still show that I went to rubysash.com. With a socks proxy and the option to tunnel web traffic including DNS requests through the tunnel, everything will appear to come from the server, not my client. My ISP would still show a SSH connection to the server, but that’s it. Unless it also has access to the server and the network it resides on, they will not know what happens from that point.
- Secure Admin Area Logins
- If I am a road warrior and need to access a secure area, I might trust a simple https connection. With MITM attacks becoming more prevalent and government spying, I would prefer to use a tunnel to access to connection instead. This is done by using an Access Control List on apache to allow access to the protected area ONLY from itself. Then I SSH to the server, and browse the admin area using my server IP instead of my client IP. There is no network to traverse for the https request at this point as it originates on the server itself. For example, go to the wp-admin section of this website. You’ll get a “Forbidden” message because you are not accessing from the IP of the server. Many weak authentication methods can be protected this way (htbasic auth I’m looking at you)
- Socks Proxy for Secure Browsing
- If I were malicious, I might setup a free wifi near a hotel or coffee shop. I would then use my MITM box and wait for people to connect. Then my marks would log into their bank and I would fake the cert, intercept their request, give them a spoofed login page, collect their credentials and then empty their account. This is how easy it is. The hardware to this task is only a few hundred bucks and you better believe that law enforcement has similar technology. Instead of risking it, I might want to access wells fargo from a safer computer, like my vacation home in zimbabwe (kidding). The point is you can make your request come from anywhere in the world, effectively bypassing any network you desire.
- Socks Proxy to Bypass IP based Limits
- Netflix won’t let you watch a movie while traveling? Set your IP to be from a US based computer and keep watching.
You get the idea now about the why you would use a Socks Proxy, I hope. This is extremely useful for good and bad guys alike.
How to Setup the SSH Tunnel
There are only 3 steps really to using a SSH Tunnel/Socks Proxy.
- Install SSH Server (windows 10 has SSH too)
- Setup Your Client (cygwin, putty, openSSH, etc)
- Setup Browser/Application to use the Socks Proxy
- Verify IP Has Changed
1. Install SSH Server
SSH Server on Redhat variants:
|
1 2 3 4 |
$ yum install openssh openssh-server openssh-clients openssl-libs $ vim /etc/ssh/sshd_config |
Debian variants:
|
1 2 3 4 |
$ apt-get install openssh-client openssh-server $ vim /etc/ssh/sshd_config |
Windows 10:
(take your pick)
- Bit Vise ($100)
- VanDyke (60 day Eval)
- Fortress SSH ($800)
- c:\windows\system32\Openssh (Goto Apps, Goto Apps & features) (Free)
- Cygwin (Free)
2. Setup SSH Client CLI/Cygwin
I prefer Cygwin or CLI. Here are two examples of a SSH Tunnel command. After you run this command, you configure your browser. This is making the tunnel. Later we’ll see how to use it.
Example 1 is a normal tunnel from client to server 1.2.3.4 where everything on the client that hits port 7070 will be proxied over to the remote ephemeral port on the server. Only root can bind privileged ports (80/443 for example). The sleep command
|
1 2 3 |
ssh user@1.2.3.4 -D 7070 -N sleep 9999 |
The -D command enables the tunnel as a SOCKS server. We use “sleep 9999” to keep the ssh connection running (keeps the tunnel up longer). the -N says don’t use a shell, just create the tunnel. Ctrl + C to end this SSH Tunnel.
Before the Tunnel:
 Before the tunnel we do not have port 7070 open. A review of netstat will show us evidence of this:
After the Tunnel:
After the tunnel, we can clearly see that the port is open (PID 10856).

What happens if you must access the final host from an intermediary jumphost? You can bind your local port to a SSH tunnel on a remote computer jumphost to get to your final host. Here is an example that says: Bind port 7070 on my client to go through ssh port 8888 on jumphost and exit (use) port 22 on finalhost:
|
1 2 3 |
ssh -p 8888 -t -L7070:localhost:5590 root@jumphost ssh -p 22 -t -D5590 user@finalhost |
The -p specifies a port. The -t option is required because I’m using keys. -L says to bind 7070 locally and send it to port 5590 but then -D says use port 5590 as my exit port.
Before the Tunnel:
It doesn’t matter if we go through 1 or more tunnels. From the client perspective we are simply going to send traffic to port 7070. The Socks proxy will then send it own down the path as it has been configured.
After the Tunnel:

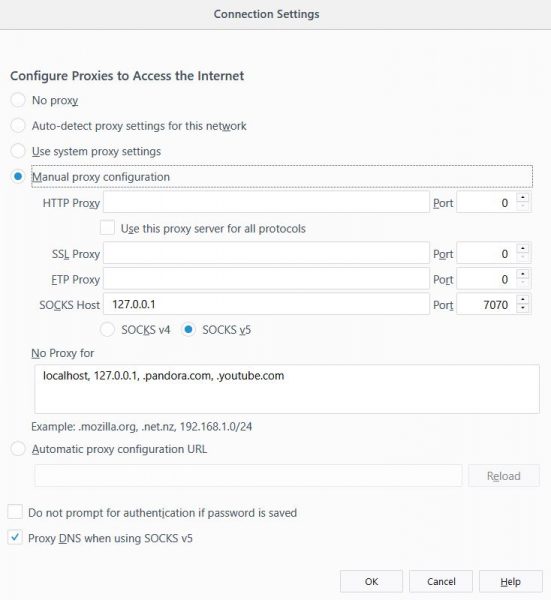
3. Setup Browser/Application to use the Socks Proxy
Go to settings in the application and tell it to use socks proxy on port 7070.
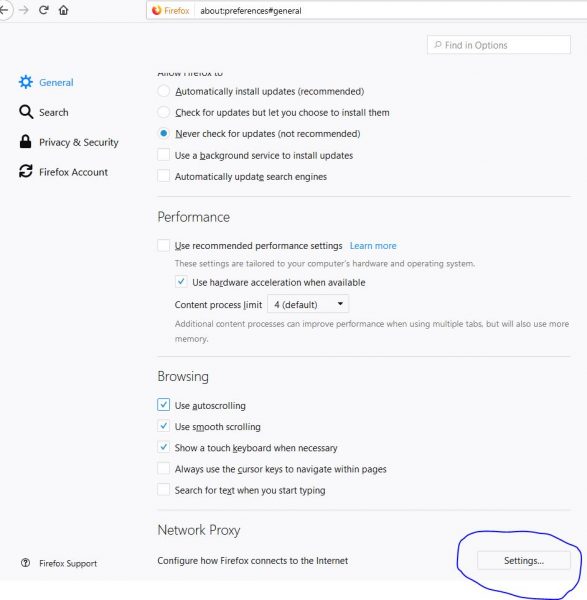
Specify the port (7070) and bypass anything you don’t want to send over the tunnel (youtube for example). You would bypass certain sites because the tunnel is slower than regular traffic use, and no sense in piping your media streams if you don’t need to:
4. Verify IP has Changed:
Visit a site like http://whatismyip.host/ to verify your ip has changed. If the tunnel is up and you are using it, you should see the IP of the server for your tunnel, not the client.