
Enable ed25519 SSH Keys Auth on Ubuntu 18.04
By now, you probably know you should be using keys instead of passwords. This article details how to setup password login using ED25519 instead of RSA for Ubuntu 18.04 LTS.
Why SSH Keys Are Needed
A key is a physical (digital version of physical) access token that is harder to steal/share. We use keys in ssh servers to help increase security. Keys also make brute force attacks much more difficult.
Why ED25519 instead of RSA
ED25519 has been around for several years now, but it’s quite common for people to use older variants of RSA that have been proven to be weak. It is generally considered that an RSA key length of less than 2048 is weak (as of this writing). ED25519 is a better, faster, algorithim that uses a smaller key length to get the job done.
By upgrading to better security now, you are more prepared for future security threats.
Check the Strength of Existing Keys
To check the key length, you need to use the ssh-keygen command as follows:
|
1 2 3 4 |
$ ssh-keygen -l -f ~/.ssh/id_rsa.pub 2048 SHA256:AAAAAVVBASD/+sdfasdfsdfasdfasdfasdf user@host (RSA) |
If you see RSA “1024” instead of RSA “2048” you should regenerate your keys to at least RSA 2048. Hopefully your organization will also upgrade all the way to ED25519 and fall back to RSA 2048 or RSA 4096 for compatibility.
What Could Break if you Upgrade SSH Keys
- SSH Login
- Your logins could simply stop working if you do the upgrade wrong. For this reason, make sure you have local access and backup any files you edit. You can also add ED25519 and continue to use RSA as you upgrade your clients.
- Incompatible SSH Key Exchanges
- In some legacy systems, you simply cannot use the updated technology. If you are doing production work on systems this old though, you have other security concerns to worry about as well!
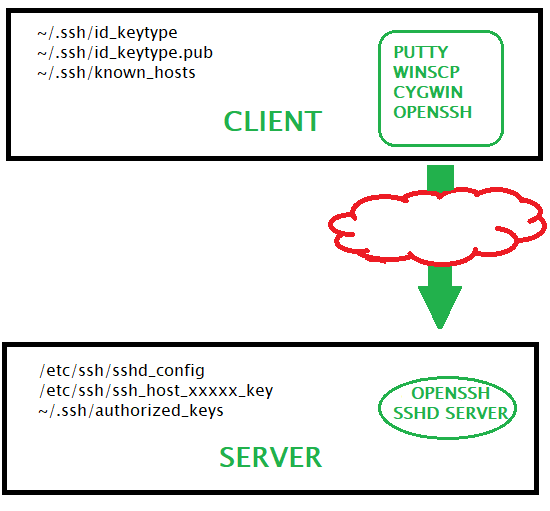
Basics of SSH KEY on the Client
Here is a simplified overview of what the rest of the article will cover:
- Generate Keys on the client
- Copy the PUblic Key to Server
- Use Private Key to Encrypt Login to Server
- Server uses Public Key to verify
Server Setup to Use SSH Keys
- Generate Keys
- Specify allowed Key Exchange, and Encryption methods
- Specify a bunch of other stuff while you’re at it
- Test the connection
On Server, Backup SSH Settings/Keys
This assumes default locations and/or files!
|
1 2 3 4 |
$ mkdir ~/backupssh/ $ cp ~/.ssh/ ~/backupssh/ -R |
On Client, Backup SSH Settings/Keys
You will have to perform these actions as root.
|
1 2 3 4 5 |
$ mkdir ~/backupssh/ $ cp ~/.ssh/ ~/backupssh/ -R $ cp /etc/ssh/* ~/backupssh/ -R |
Verify SSH Keys Exist on Client and Server
If they exist, they will be in the ~/.ssh/ folder most likely. It is possible for a key to exist in a different directory too. The client config for ssh would probably list their alternate location if that was the case (but it’s probably not).
|
1 2 3 |
$ ls -al ~/.ssh |
Client Example of Cygwin SSH Key Files and Permissions
You will have similar files on whatever your client is, but this is what Cygwin on Windows looks like:
|
1 2 3 4 5 6 7 8 9 10 11 |
$ ls .ssh -alF total 22 drwx------+ 1 david None 0 Dec 14 18:11 ./ drwxr-xr-x+ 1 david None 0 Dec 14 20:13 ../ -rw------- 1 david None 464 Dec 14 17:57 id_ed25519 -rw-r--r-- 1 david None 97 Dec 14 17:57 id_ed25519.pub -rw------- 1 david None 1491 Dec 14 17:57 id_rsa -rw-r--r-- 1 david None 398 Dec 14 17:57 id_rsa.pub -rw-r--r-- 1 david None 6924 Dec 15 10:08 known_hosts |
On Client, Generate ed25519 SSH Keys
If the keys do not exist, you’ll need to generate them. This will create a private key file (which should be guarded). You’ll need to generate the keys for your client to offer key exchange to the server. The command on the client is:
|
1 2 3 |
ssh-keygen -o -a 100 -t ed25519 -f ~/.ssh/id_ed25519 -C "david@client" |
- -f
- Specifies filename of the keyfile, used for specifying other than default name
- -a
- number of primality test while screening DH-GEX candidates
- -t
- type of key (RSA, ED25519, DSA, etc)
- -C
- Comment (not used in algorithm, only used in public key)
- -o
- openSSH key format instead of older PEM (needs OpenSSH 6.5+)
On Server, Make Directory and Set Permissions
|
1 2 3 4 |
$ mkdir -p ~/.ssh $ chmod 0700 ~/.ssh |
On Client, Copy Public SSH Key to Server
ssh-copy-id is the preferred way. If you cannot ssh into the machine, you probably also cannot ssh-copy-id into it.
|
1 2 3 4 5 6 |
$ ssh-copy-id -i ~/.ssh/id_ed25519.pub david@server -p 22 /usr/bin/ssh-copy-id: INFO: Source of key(s) to be installed: "/home/david/.ssh/id_ed25519.pub" /usr/bin/ssh-copy-id: INFO: attempting to log in with the new key(s), to filter out any that are already installed /usr/bin/ssh-copy-id: INFO: 1 key(s) remain to be installed -- if you are prompted now it is to install the new keys |
If for some reason you cannot ssh-copy-id, you can also pipe it through ssh, or simply paste the id_xxxx.pub file contents at the bottom of the ~/.ssh/authorized_keys file. Here is how to do it via ssh pipe:
|
1 2 3 |
cat ~/.ssh/id_rsa.pub | ssh user@server "mkdir -p ~/.ssh && cat >> ~/.ssh/authorized_keys" |
Here is an example .pub file:
|
1 2 3 4 |
cat ~/.ssh/id_rsa.pub ssh-rsa kjJKL/adfnklb230uanklQkjasdfklPjasdfn//234Qj+F. david@client |
You just need to update the authorized_keys file on the server with the client .pub contents at the end of it and save it. You will need
Generate Keys on Server if They Don’t Exist
These are actual hostkey fingerprint files. We are going to remove the old ones, generate new ones, and then eventually restart sshd (not yet) to activate them.
Known Host Error
Regenerating ssh keys will cause the client to have an error message about known hosts. You simply remove the old fingerprint on your client and try again. This changes the fingerprint of the server, so the error is valid.
We are going to generate both RSA and ed25519 so we can choose great security, or fall back to lesser security for compatibility.
|
1 2 3 4 5 |
$ rm /etc/ssh/ssh_host_* ssh-keygen -t rsa -b 4096 -f /etc/ssh/ssh_host_rsa_key -N "" ssh-keygen -t ed25519 -f /etc/ssh/ssh_host_ed25519_key -N "" |
Remove Small Diffie-Hellman Moduli
If you use the RSA method, we want to make sure it doesn’t do a DH handshake with a weak key, so remove any weak keys:
|
1 2 3 4 |
$ awk '$5 >= 3071' /etc/ssh/moduli > /etc/ssh/moduli.safe mv /etc/ssh/moduli.safe /etc/ssh/moduli |
On Server, Disable DSA and ECDSA HostKeys
We are going to comment out dsa and ecdsa as both are not good for security.
|
1 2 3 4 5 |
$ vim /etc/ssh/sshd_config #HostKey /etc/ssh/ssh_host_dsa_key #HostKey /etc/ssh/ssh_host_ecdsa_key |
On Server, Enable ed25519 HostKey
In the same sshd_config file we will enable rsa and ed25519 for hostkey
|
1 2 3 4 5 |
$ vim /etc/ssh/sshd_config HostKey /etc/ssh/ssh_host_rsa_key HostKey /etc/ssh/ssh_host_ed25519_key |
Example SSHD_CONFIG File
Here is our final config and the references we used to build it. Do not copy and paste this config, it will not work for you. Understand what each section does!
|
1 2 3 4 5 6 7 8 9 10 11 12 13 14 15 16 17 18 19 20 21 22 23 24 25 26 27 28 29 30 31 32 33 34 35 36 37 38 39 40 41 42 43 44 45 46 47 48 49 50 51 52 53 54 55 56 57 58 59 60 61 62 63 64 65 66 67 68 69 70 71 72 73 74 75 76 77 78 79 80 81 82 83 84 85 86 87 88 89 90 91 92 93 94 95 96 97 98 99 100 101 102 |
$ cat /etc/ssh/sshd_config #https://stribika.github.io/2015/01/04/secure-secure-shell.html #https://www.lowendguide.com/3/security/how-to-harden-and-secure-ssh-for-improved-security/ #https://www.rackaid.com/blog/how-to-harden-or-secure-ssh-for-improved-security/ #https://research.kudelskisecurity.com/2013/11/28/openssh-hardening-for-cloud-machine-part-1/ #https://linux.die.net/man/5/sshd_config # clean up noise on logs Port 22 # Best Practice, Proto 2 only Protocol 2 # Enforce file permissions of user configs StrictModes yes # For SSH session multiplexing only MaxSessions 50 # Depreciated, login then startup process, separate privs UsePrivilegeSeparation yes # Max time you have to actually login before disconnect LoginGraceTime 30 # max unauthed startup of ssh MaxStartups 2 # not using X11 forwards, but user can still use their own forwarder X11Forwarding no X11DisplayOffset 10 # other forwarding (if you use ssh tunnel don't disable this) #AllowTcpForwarding no #GatewayPorts no #PermitTunnel no # hostkeys, aka "fingerprint", Server authenticity HostKey /etc/ssh/ssh_host_ed25519_key # Depreciated though KeyRegenerationInterval 3600 # who can login, better to use AllowedGroups, but this works AllowUsers root david # How they login PasswordAuthentication no PubkeyAuthentication yes PermitRootLogin without-password PermitRootLogin yes # if PAM yes, only root can login, and disable challenge UsePAM yes ChallengeResponseAuthentication no # Logging, MaxAuth if > 1 fails, logs SyslogFacility AUTH LogLevel VERBOSE MaxAuthTries 2 # Rhosts IgnoreRhosts yes HostbasedAuthentication no # system sends keepalive to other side, death is noticed, prevents ghosts TCPKeepAlive yes # Banner and info to user Banner /etc/issue.net PrintLastLog yes PrintMotd no # do not foward local settings, server wide AcceptEnv LANG LC_* # allow sftp Subsystem sftp /usr/lib/openssh/sftp-server # If not contact from client, disconnect them ClientAliveInterval 30 ClientAliveCountMax 3 # ipv4 only AddressFamily inet # Key Exchange Algos for initial encryption # curve is better, but keep DH for WinSCP and Eclipse interop and Possibly Git Hub KexAlgorithms curve25519-sha256,curve25519-sha256@libssh.org,diffie-hellman-group-exchange-sha256 # Allowed Ciphers for use after kex # chacha20-poly1305 is preferred over aes to prevent certain types of traffic analysis # if using aes and you want better security wrap it in a Tor hidden service # ctr is for compatibility, but we remove 128 and force manually enable if needed later #Ciphers [email protected],[email protected],[email protected],aes256-ctr,aes192-ctr,aes128-ctr Ciphers chacha20-poly1305@openssh.com,aes256-gcm@openssh.com,aes256-ctr,aes192-ctr # Data Integrity Algos # we really only want encrypt then MAC types, which eliminates timing channels MACs hmac-sha2-256-etm@openssh.com,hmac-sha2-512-etm@openssh.com,umac-128-etm@openssh.com |
Restart the SSH Server
WARNING!! It is advisable to have two shells running. One one shell, ssh in and edit your files. On the other shell, test login after you have done edits. It’s possible one of your changes will lock you out of SSH. Make sure you have some type of out of band management!
Once you restart ssh, you have a chance of not getting back in until you copy the backups back and figure out what was wrong.
|
1 2 3 |
service ssh restart |
Test Key from Client to Server
After you’ve restarted the sshd server, go ahead and try to manually use the key. Later, if it’s the only key found in ~/.ssh/ it will choose it by default and the -i flag is not required.
|
1 2 3 |
ssh -i ~/.ssh/id_ed25519 david@server |
Troubleshooting SSHD Key Problems
Your /etc/ssh stuff will be owned by root and readable something like what is below:
Verify Server Key Permissions
|
1 2 3 4 5 6 7 8 9 10 11 12 13 14 15 |
$ ls /etc/ssh/ total 552 drwxr-xr-x 2 root root 4096 Dec 15 12:38 ./ drwxr-xr-x 104 root root 12288 Dec 11 06:08 ../ -rw-r--r-- 1 root root 511854 Dec 15 10:00 moduli -rw-r--r-- 1 root root 1580 Feb 9 2018 ssh_config -rw------- 1 root root 2882 Dec 15 12:04 sshd_config -rw-r--r-- 1 root root 3262 Oct 28 09:48 sshd_config.ucf-dist -rw------- 1 root root 399 Dec 15 09:59 ssh_host_ed25519_key -rw-r--r-- 1 root root 95 Dec 15 09:59 ssh_host_ed25519_key.pub -rw------- 1 root root 3247 Dec 15 12:38 ssh_host_rsa_key -rw-r--r-- 1 root root 739 Dec 15 12:38 ssh_host_rsa_key.pub -rw-r--r-- 1 root root 338 Oct 28 09:52 ssh_import_id |
Verify SSH Key File Permissions on Cygwin Client
Your client files will be owned by the user, and owned something like what follows (Cygwin Example):
|
1 2 3 4 5 6 7 8 9 |
$ ls .ssh -alF total 22 drwx------+ 1 david None 0 Dec 14 18:11 ./ drwxr-xr-x+ 1 david None 0 Dec 14 20:13 ../ -rw------- 1 david None 464 Dec 14 17:57 id_ed25519 -rw-r--r-- 1 david None 97 Dec 14 17:57 id_ed25519.pub -rw-r--r-- 1 david None 6924 Dec 15 10:08 known_hosts |
Verify SSH Key File Permissions on Server
This server example has an rsa and ed25519 key as it accesses several other servers.
|
1 2 3 4 5 6 7 8 9 10 11 12 |
$ ls ~/.ssh -alF total 24 drwx------ 2 david david 4096 Dec 14 15:51 ./ drwx------ 7 david david 4096 Dec 10 20:40 ../ -rw------- 1 david david 397 Mar 30 2018 authorized_keys -rw------- 1 david david 464 Dec 14 17:57 id_ed25519 -rw-r--r-- 1 david david 97 Dec 14 17:57 id_ed25519.pub -rw------- 1 david david 1766 Mar 24 2015 id_rsa -rw-r--r-- 1 david david 395 Mar 24 2015 id_rsa.pub -rw------- 1 david david 1332 Dec 10 20:11 known_hosts |
Troubleshoot SSH Service
|
1 2 3 4 5 6 7 8 9 10 11 12 13 14 15 16 |
$ systemctl status ssh.service ● ssh.service - OpenBSD Secure Shell server Loaded: loaded (/lib/systemd/system/ssh.service; enabled; vendor preset: enabled) Active: active (running) since Sat 2018-12-15 12:04:42 CST; 3s ago Process: 23167 ExecStartPre=/usr/sbin/sshd -t (code=exited, status=0/SUCCESS) Main PID: 23169 (sshd) CGroup: /system.slice/ssh.service └─23169 /usr/sbin/sshd -D Dec 15 12:04:42 server systemd[1]: Starting OpenBSD Secure Shell server... Dec 15 12:04:42 server sshd[23169]: /etc/ssh/sshd_config line 20: Deprecated option UsePrivilegeSeparation Dec 15 12:04:42 server sshd[23169]: /etc/ssh/sshd_config line 41: Deprecated option KeyRegenerationInterval Dec 15 12:04:42 server sshd[23169]: Server listening on 0.0.0.0 port 22. Dec 15 12:04:42 server systemd[1]: Started OpenBSD Secure Shell server. |
Debug Your SSH Connection
This is a snippet of code with the important parts shown from a client connecting to the server. The logs are showing on the client screen.
- ssh protocol
- key exchange and encryption info: algorithm, cipher, MACs, etc
- server, port
-vvv gives even more info and might be worth looking at if you cannot login.
|
1 2 3 4 5 6 7 8 9 10 11 12 13 14 15 16 17 18 19 20 21 |
$ ssh david@server -p 22 -v OpenSSH_7.5p1, OpenSSL 1.0.2k 26 Jan 2017 debug1: Connecting to server [5.5.5.5] port 22. debug1: Connection established. debug1: identity file /home/david/.ssh/id_ed25519-cert type -1 debug1: Enabling compatibility mode for protocol 2.0 debug1: kex: algorithm: curve25519-sha256 debug1: kex: host key algorithm: ssh-ed25519 debug1: kex: server->client cipher: chacha20-poly1305@openssh.com MAC: compression: none debug1: kex: client->server cipher: chacha20-poly1305@openssh.com MAC: compression: none debug1: Server host key: ssh-ed25519 SHA256:... debug1: Host '[server]:22' is known and matches the ED25519 host key. debug1: kex_input_ext_info: server-sig-algs=<ssh-ed25519,ssh-rsa,rsa-sha2-256,rsa-sha2-512,ssh-dss,ecdsa-sha2-nistp256,ecdsa-sha2-nistp384,ecdsa-sha2-nistp521> debug1: Authentications that can continue: publickey debug1: Next authentication method: publickey debug1: Offering ED25519 public key: /home/david/.ssh/id_ed25519 debug1: Server accepts key: pkalg ssh-ed25519 blen 51 Enter passphrase for key '/home/david/.ssh/id_ed25519': ssh-ed25519,ssh-rsa,rsa-sha2-256,rsa-sha2-512,ssh-dss,ecdsa-sha2-nistp256,ecdsa-sha2-nistp384,ecdsa-sha2-nistp521 |
Further Secure Your SSH Connection
You will want to follow standard OS hardening guides and use a Firewall to Protect SSH. This article focused on using ed25519 and stronger types of RSA encryption than what we are seeing most people use.
Hey, thanks for this resource, really fancy written and accurate on the descriptions and how to apply these mechanisms to a Linux server to keep it secured. Also, I read through other tutorials that is part of the best practices to remain root login disabled. Just as a note.
Thanks.